Category: DIY Projects and Instructionals/Videos


 photo FamilySurvivalProtocolColliseumBannergrayscale900x338_zpsb17c85d0.jpg

*************************************************

Wheat Berries – Long Term Storage – Part 1


Wheat Berries – Long Term Storage – Part 2

Wheat Berries – Long Term Storage – Part 3


…………………………………

Long-Term Survival Food Storage: Whole Wheat Berries


Making Bread from Home Ground Wheat


Easy Wheat Sprouting nothing special needed


Wheat berry recipes

by ingredients, cooking time, nutrition facts, collections


59 wheat berry recipes

Berry Berry Streusel Bars

Berry Berry Streusel Bars

 Raspberry jam and blueberries make these berry berry streusel bars packed with goodness and yumminess. Perfect for breakfast.

about 1 hour ago

Arugula, Chickpea and Wheat Berry Salad

Arugula, Chickpea and Wheat Berry Salad

 Wheat berries, chickpeas, roasted bell peppers, and arugula are tossed with a refreshing and flavorful dressing. It fills you up with lots of goodness and yumminess.

2 minutes ago

Israeli Wheat Berry Stew

 Try this delicious rendition of stew that’s made with great northern beans, wheat berries and a bit of cumin and turmeric.

Oatmeal and Berry Pancakes

Oatmeal and Berry Pancakes

 These delicious pancakes are full of yumminess and goodness. They are moist in the inside, and slightly crispy on the outside. Berries give you some juicy explosion in every bite. They are perfect for breakfast.

about 9 hours ago

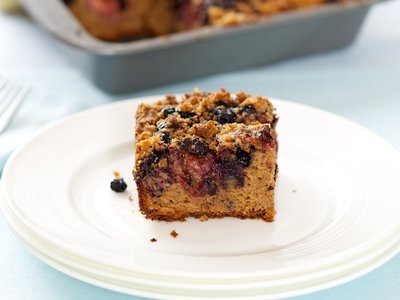
Mixed Berry Coffee Cake

Mixed Berry Coffee Cake

 Moist, fruity and very tasty! An ideal cake you can have with a cup of coffee or tea.

28 minutes ago

Warm Crepes with Berry Sauce

Warm Crepes with Berry Sauce

 Warm, juicy and fruity. These warm crepes are served with freshly made blueberry-raspberry sauce. Delicious and also good for you.


 photo FamilySurvivalProtocolColliseumBannergrayscale900x338_zpsb17c85d0.jpg

********************************************************

Ship’s Bisket – Hard Tack: 18th Century Breads, Part 1. S2E12


Making High Protein Hardtack


Simple Hardtack Recipe


……………………………………….

How to Eat 3 Year Old Hard Tack


Arizona Bushman Arizona Bushman


Uploaded on May 24, 2008

http://www.arizonabushman.com The construction of the solar still.


Enhanced by Zemanta

A Heavy Duty $6 DIY Rocket Stove

Cook Different Cook Different

Published on Dec 10, 2013

In this video I layout a pretty simple process for building a rocket stove that will you a lifetime and uses a very small amount of fuel (wood, sticks, pinecones, etc) to cook your meals with. Be sure to follow me on Facebook at http://facebook.com/cookingdifferent

…..

The “4 Block” Rocket Stove! – DIY Rocket Stove – (Concrete/Cinder Block Rocket Stove) – Simple DIY

desertsun02

Published on Nov 9, 2013

How to make a “FOUR BLOCK” Rocket Stove! Easy DIY. Four concrete blocks is all it takes to make it!. Cost $5.16. video shows you how to put it together. the stove funnels all its heat up under the bottom of the pan. uses very little fuel. fueled by small sticks, twigs and leaves. cooks great. wind and rain resistant

…..

The “6 Block” Rocket Stove! DIY – “DUAL BURNER” Rocket Stove! (Concrete Block Rocket Stove) DIY

desertsun02

Published on Nov 17, 2013

Homemade “6 Block” Rocket Stove. DIY “Dual Burner” Rocket Stove is made from only 6 blocks!. similar to the 4 block rocket stove. uses the same blocks. (just add 2 “Half Blocks”). great for emergency/SHTF or everyday use

…..

Enhanced by Zemanta

The Do It Yourself World The Do It Yourself World

Published on Oct 18, 2013

Simple biomass briquettes you can make as a survival fuel source. Read full article: http://www.thediyworld.com/blog/?p=1469

With a simple caulk gun, some pvc tubing and a bit of hardware you can make a biomass briquette press. I show you how in a previous video. The link to that article can be found on the page above.

With access to a source of paper you can make your own survival heating and cooking fuel with ease. All you need is a bunch of shredded paper. If you have a paper shredder then you can shred paper yourself to use for biomass briquettes. You can also make a paper shredder if needed. Or you can shred paper by hand in an emergency.

For people living in the cities where wood as a fuel source is scarce this is a great survival skill to have. After the recent hurricanes on the East Coast many people were left without power for weeks or even months. People had not light, heat or access to clean drinking water.

Knowing how to make biomass briquettes can save your life and make a grid down situation more bearable.

If you live in the city it may be a good idea to have homemade biomass briquettes on hand already just in case of emergency.

You can use your biomass briquettes in a charcoal grill (outdoors only), in a wood stove or even an empty paint can in an emergency.

In a later article I will show you how to use a mix of paper and natural materials such as leaves to make biomass briquettes.

This project is presented by The Do It Yourself World.
http://www.TheDIYworld.com

Experiments and projects in off grid living, alternate energy, survival, hiking and more.

Enhanced by Zemanta


4 Effective & Natural DIY Drain Cleaners

By Cris Carl, Hometalk

Having a clogged sink begs the old chestnut about an ounce of prevention being worth a pound of cure. There are a lot of things that should never go down a drain, especially if you have a septic system. To avoid clogs to begin with, you have to avoid allowing food particles, grease, and hair from going down the drain. It’s helpful to have a small piece of wire mesh over your drains to catch food or hair particles. Just be sure to clean the mesh regularly or it will start to smell.

Now, for a dose of reality, no one is perfect. We have a lazy moment, or the kids are washing the dishes and aren’t paying attention, or we get too busy to notice all that hair in the tub. Sooner or later, you’ll end of with a clogged drain.

I have two drains that tend to clog more often in my house, the tub and the laundry sink. The tub drain gets clogged with hair and body care products. My washing machine drains via a plastic pipe into a laundry sink so fibers and lint build up in the drain.

The problem with commercial drain cleaners is they corrode pipes, are bad for septic systems, are toxic to ground water, and they can damage the materials that your sink or tub are made of. I recently had to change the drain and fixtures on my bathroom sink due to corrosion from commercial cleaners. After that experience, I decided to try non-toxic and far less corrosive methods for clearing pipes.

Before you try a DIY drain cleaner

It’s best to remember to use your DIY drain cleaners routinely before the clogs happen. When you are trying a DIY drain cleaner, it will likely take longer than a commercial drain cleaner. You also may need to repeat your efforts more than once. Many DIY drain cleaners will take up to an hour to work.

Just like in the Heimlich maneuver, look first to see if you can actually see the clog. It’s not a fun task, but put on your rubber gloves and dig the hair and goop out first. You may also want to try plunging the drain and running hot water alternately a couple of times. If the clog is minor, that may be all you need to do.

Baking soda, the top DIY drain cleaner

The most commonly used DIY drain cleaner is using one cup of baking soda and one cup of cider vinegar. The intense foaming action, followed by running plenty of hot water, is good routine maintenance. I have to admit I was surprised the first time I saw the drain pop open after trying this. The tub drain was still pretty slow, so I repeated the method.


Read More Here

Enhanced by Zemanta

LearnHowToGarden LearnHowToGarden

Published on Apr 5, 2013

http://learn-how-to-garden.com

Thought I would share with you how to make a no dig potato bed. This type of bed is easily constructed and can save you so much time and effort as well as producing a brilliant crop.

Mark Abbott-Compton

Ten Minute Gardener

Enhanced by Zemanta

*************************************************************

Caution 

Music at the  beginning of the  video  is extremely  loud so please be sure  to  lower  your  volume settings  as I  have no  control over the settings  used to  create  the  original  video.

~Desert Rose~

**************************************************************

medfaxx medfaxx

Uploaded on Apr 27, 2009

Healthier more robust plants, better drainage, improved uptake of nutrients, preserves beneficial living organisms, more organic matter, more humus, better water infiltration, holds more water, break down and recycle soil nutrients.
Video by Dr. Milton Ganyard at HerbFest to benefit the Graham Johnson Cultural Arts Endowment, http://www.gjcae.org.

Enhanced by Zemanta

Vegetables. Image by Hans Hillewaert, Wikimedia Commons

***************************************************

MOTHER EARTH NEWS

Freezing Vegetables From Your Garden

Round out your food preservation regimen! Use these great tips for freezing vegetables to turn your garden harvests into delicious, off-season meals.

By Barbara Pleasant
August/September 2013

Freezing vegetables is a fast and easy form of food preservation, and most crops, such as asparagus, broccoli, green beans, peppers, summer squash, dark leafy greens and all types of juicy berries, will actually be preserved best if frozen. Part of the beauty of freezing vegetables is that you can easily do it either in small batches — thus making good use of odds and ends from your garden — or in one big batch of your homegrown harvest or peak-season, discounted crops from the farmers market. Unlike with canning, you don’t have to pay attention to acidity or salt when freezing vegetables. Instead, you can mix and match veggies based on pleasing colors and flavors — for instance, using carrots for color, bulb fennel for texture, and green-leafed herbs for extra flavor. You can include blanched mild onions in your frozen combos (a good use for bolted onions that won’t store well), but don’t include garlic, black pepper or other “seed spices,” which can undergo unwanted flavor changes when frozen.

The greatest amount of space in my freezer belongs to vegetables, mostly in freezer bags that stack nicely because I first freeze the vegetables flat on cookie sheets. I also allot freezer space for odd-shaped packages, such as those for cabbage leaves that have been blanched and frozen flat for making cabbage rolls in winter. I even steam-blanch and freeze an assortment of hollowed-out, stuffable veggies, such as pattypan squash, zucchini, small eggplant and peppers. By season’s end, the contents of my freezer reflect the full diversity of my garden.

Freezing Vegetables: The Basics

Only use fruits and veggies in excellent condition that have been thoroughly cleaned. Most vegetables you plan to freeze should be blanched for two to five minutes, or until they are just done. Blanching — the process of heating vegetables with boiling water or steam for a set amount of time, then immediately plunging them into cold or iced water — stops enzyme activity that causes vegetables to lose nutrients and change texture. The cooled veggies can then be packed into bags, jars or other freezer-safe storage containers. Fruits or blanched vegetables can also be patted dry with clean kitchen towels, frozen in a single layer on cookie sheets, and then put into containers. Using cookie sheets for freezing ensures that the fruits and vegetables won’t all stick together, thus allowing you to remove a handful at a time from the container.

Unless you’re freezing liquids — which require space for expansion — you should remove as much air as possible from within the freezer container. With zip-close freezer bags, you must squeeze out the air by hand, whereas a vacuum sealer will suck out air as it seals the bags. Vacuum sealing reduces freezer burn (the formation of ice crystals that refreeze around the edges of the food and damage its taste and texture) because the crystals have no space in which to form. To read more about freezer-safe container options, see “Can You Freeze in Canning Jars?,” later in this article.

Read More  Here

Enhanced by Zemanta

MOTHER EARTH NEWS

Manage these vigorous self-seeders so you’ll never have to buy seeds again.

By Barbara Pleasant
August/September 2010

self-seeding crops
Letting crops flower and go to seed also supports beneficial insects!
ILLUSTRATION: ELAYNE SEARS

One of the characteristics of a truly sustainable garden is that it produces at least some of its own seed. This is most often done when gardeners select, harvest and store seeds until the proper time for planting the following year. But some self-seeding crops produce seeds so readily that as long as you give them time to flower and mature, and set seed, you will always have free plants growing in your garden. You can simply let the seeds fall where they are, or toss pieces of the seed heads into the corners of your garden, or whichever area you want them in — no harvesting, storing or replanting required. With most self-seeding vegetables, herbs and annual flowers, you’ll just need to learn to recognize the seedlings so you don’t hoe them down. Should seedlings require relocation, you can simply lift and move them — after all, they are sturdy field-grown seedlings.

In addition to getting all the free garden plants you need (and some to share with family and friends), nurturing self-seeders is also a great way to provide a diversity of flowers that supply pollen and nectar for beneficial insects. Self-seeding flowers, herbs and vegetables that show up in early spring include arugula, calendula, chamomile, cilantro, dill, breadseed poppies and brilliant red orach (mountain spinach). Nasturtiums, amaranth, New Zealand spinach, and even basil or zinnias appear later, after the soil has warmed.

Starting a new colony of any of these annuals is usually a simple matter of lopping off armloads of brittle, seedbearing stems in the fall, and dumping them where you want the plants to appear the next season. It’s that easy. Most of the seedlings will appear in the first year after you let seed-bearing plants drop their seeds, with lower numbers popping up in subsequent seasons.

Working with reseeding, or self-sowing, crops saves time and trouble and often gives excellent results, but a few special techniques and precautions are in order. Some plants that self-sow too freely — especially perennials such as garlic chives or horseradish — will cross the line into weediness if not handled with care.

Spring Seeds for Fall Crops

The first group of plants to try as self-sown crops — both because they’re the easiest and they’ll be ready the same year — are those that tend to bolt in late spring. If allowed to bloom and set seed, dill, radishes, arugula, cilantro, broccoli raab, turnips and any kind of mustard will produce ripe seeds in time for fall reseeding in most climates. Lettuce will take a little longer, but often gives good results in Zone 5 or warmer.

One way to encourage self-seeders is to select vigorous plants from a larger planting, and let these plants grow unharvested until they bloom and produce seeds. This will work well enough, but it’s often bothersome to have one lone turnip holding up the renovation of a planting bed. To get around this problem, use a Noah’s ark approach: Set aside a bed or row and transplant pairs of plants being grown for seed into the ark bed. As the weeks pass, weed, water and stake up seed-bearing branches to keep them clean, but don’t pick from the “seed ark” bed.

Read More  Here


Enhanced by Zemanta